Here are a few enhancements that people have asked for to personalize their image. Most of them require RPi desktop access, which can be attained two ways:
a) VNC Connection from another computer (connected via Ethernet for wifi changes). I use TigerVNC for Windows.
--OR--
b) connect a monitor, mouse and keyboard to the HDMI and USB ports of the RPi
Change the WiFi access point name (ssid), password and channel:
Use the Networking icon (upper right of desktop) and use "Edit Connections" to modify the RPi-JMRI connection's SSID, password and channel selection.
Restart your RPi and verify you can connect using the new network name and password.
Change the vnc and samba passwords:
Run the following commands, and follow the prompts for each:
sudo vncpasswd -service;
sudo smbpasswd -a pi;
Change the hostname and pi user's password:
Use the Raspberry Pi Configuration, System page to change the hostname and pi user's password.
Restart your RPi, then verify your new hostname with the "hostname" command.
Disable Access Point and Enable Wifi Client
The RPi wifi adapter cannot be used as an access point and a wifi client to another network at the same time.
Use the Networking icon (upper right of desktop) and use "Edit Connections" to modify the RPi-JMRI connection's mode from "Hotspot" to "Client". Reboot. When the desktop is available again, the Networking icon will show a list of SSIDs to connect to, and will prompt for the password.
You should now be able to ping and connect to "RPi-JMRI.local" from devices on your wifi network.
Update JMRI:
Note: This assumes you have desktop access to your RPi, either by VNC client or monitor+mouse+keyboard
Exit JMRI, then run the following command to delete the old JMRI program folder (your user files and profiles are not affected):
rm -rf /home/pi/JMRI;
Then download the desired Linux version of JMRI to your RPi, using the RPi web browser, or copy from another computer using the network or a USB drive.
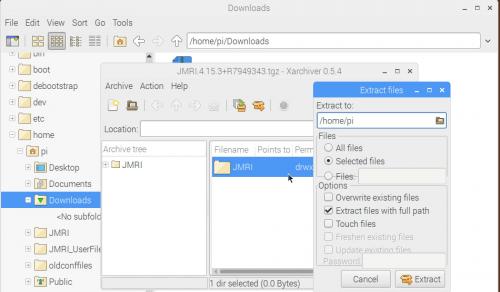
If using the web browser, the file will open in xArchiver automatically. If not, you will need to locate the file and double-click on it.
Once open in xArchiver, click the Extract icon. In the resulting "Extract files" dialog box, change the "Extract To:" to "/home/pi" and press "Extract". See screenshot. Once complete you can close all windows and double-click the PanelPro icon or simply reboot.
Set date:
The RPi does not have an internal clock, so you may need to set the clock manually to prevent errors. Run the following command, specifying the current date and time, in the specified syntax:
sudo date -s "2020-05-05 5:55pm";
"Install" DecoderPro:
DecoderPro and PanelPro are the same program, just different startup screens.
From the PanelPro main menu, just click Roster, Roster to open the Roster list you see in DecoderPro.
If you want to start with that open each time, use Edit, Preferences, Startup, Add..., Perform Action..., Open Roster.
Resize/Expand the root partition:
I build the image on an 8GB microSD card. If you have a larger card, and you need more space, you can "resize" or "expand" the root partition. From the command line, run:
sudo raspi-config;
Take option "1. Advanced Options", then "A1. Expand Filesystem", then reboot.